Today's project makes a fab masculine card, suitable for Father's Day (or Birthdays), featuring the Bubble Over Stamp Set (145868) and the Bottles & Bubbles Framelits (145663).
I think Father's Day is over looked a bit, compared to Mother's Day. So lets celebrate all those fab and amazing Dads in the world.
What you will need: Blueberry Bushel Card Stock (146991) - C6 card base
- 1 1/8" x 1 1/4"
- 2 1/2" square frame Verry Vanilla Card Stock (144238) - 4"x 5 3/4" x2
- 2 1/2" x 2 1/2"
- 1" x 1 1/8" Crumb Cake Card Stock (121685) - 3 3/4" x 51/2" Layering Square Framelits (141708) Hardwood Background Stamp Set (133035) Nailed It Stamp Set (Retired) - Father's Day Sentiment Label Me Pretty Stamp Set (143861) Inks; Early Expresso, Blueberry Bushel and Crushed Curry.
Hope you enjoyed that tutorial. Please like, subscribe and let me know what you think :)
My last project showcasing the Urban
Underground Suite!
This fantastic and fun suite will soon be retiring...so if you like the look of it, grab it while you still can. I have had so much fun playing with this set and I'm sure I will continue to use it long after the new catalogue arrives.
So on to the project... A fab little treat pouch! (featuring a yummy bar of Dairy Milk chocolate) This pouch was inspired by a creation I found on Pinterest by Craft-somnia. A fab little gift to add to a handyman or builders packed lunch.
Continuing to use the Nailed It Clear-Mount Bundle (144735) and Urban
Underground Specialty Designer Series Paper (142783) and a few extras...
You will also need;
Urban Underground DSP: Main piece - 8 1/4 X 6 3/8" (21 X 15 1/2cm) Pocket - 3 1/8 X 3 1/2" (8 X 9cm)
Ink: Crumb cake and Black
Mirror cardstock & Delightful Dijon (For the tools)
Black pen (optional - for stitched effect)
Urban Underground Embellishments (142786)
Cutting and score your DSP. Score at 3/8" (0.8cm) on the long side and 1/4" (1cm) on the short side. The score at 4" (10.5cm) from the 1/4" (1cm) line, and 1" (2.5cm) down from the other side in to the 4" (10.5cm) score line. Fold and burnish all the score lines. (I hope the conversions are correct). Cut the tabs as shown in the video and adhere down with sticky strip (or your choice of adhesive). Round off the top corners with a corner punch.
On your smaller piece of DSP use the Decorative Label punch to create a decorative top to the pocket where the tools will sit. Round off the bottom corners with a corner punch. Sponge around the edges to give a vintage/rustic look using crumb cake. Repeat the sponging effect on the edges of the main pouch making sure to put more in towards the corners.
Arrange your tools to where you wish to have them placed, adhere them and the pocket down with glue. Take a black pen to add dash lines around the pocket for a stitched effect. place 2 of the Urban Underground Embellishments to the corners of the pockets and add a sentiment if needed. Your 'Nailed It' treat pouch is ready to be filled and gifted :)
There is also plenty of space to add a message to the back of the pouch. A fab little treat idea and it would be easy to make enough for a whole school class.
Hope you enjoyed this project...and questions please drop me a message :)
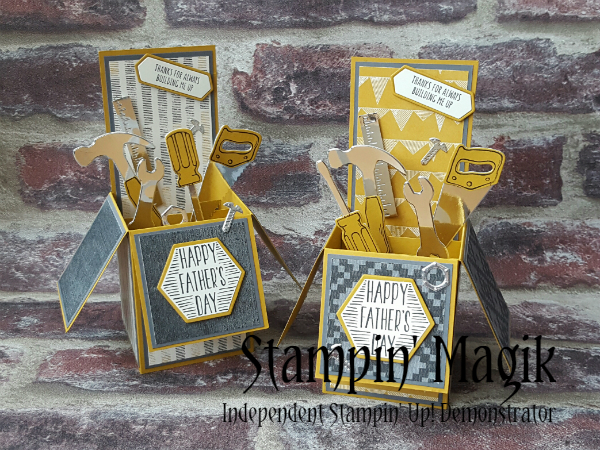
Today I am excited to share with you one of my favourite type of
cards to make…Pop-up Box cards.
These cards are that something special to gift a loved one and
they can keep it displayed on their shelf or desk…I bet they won’t want to take
it down!
For this particular card we will be making a Father’s Day card
and I will of course be using the Nailed It Clear-Mount Bundle (144735) and Urban
Underground Designer Series Paper (142783).
You will need;
Delightful Dijon - A4 sheet ( 8.3 X 11.7")
Basic Grey:
6 1/2 x 8 1/2
cm x3 (2 9/16 x 3 3/8")
6 1/2 x 6 1/2
cm x3 (2 9/16 x 2 9/16")
6 1/2 x 17 1/2 cm x2 (2 9/16 x 6 3/4")
Urban Underground DSP:
6 x 8 cm x3 (2 3/8 x 3 1/8")
6 x 6 cm x3 (2 3/8 x 2 3/8")
6 x 17 cm x1 (2 3/8 x 6 11/16")
Very Vanilla - 6 x 17 cm (2 3/8 x 6 11/16")
Ink: Black Ink
Mirror or Silver cardstock
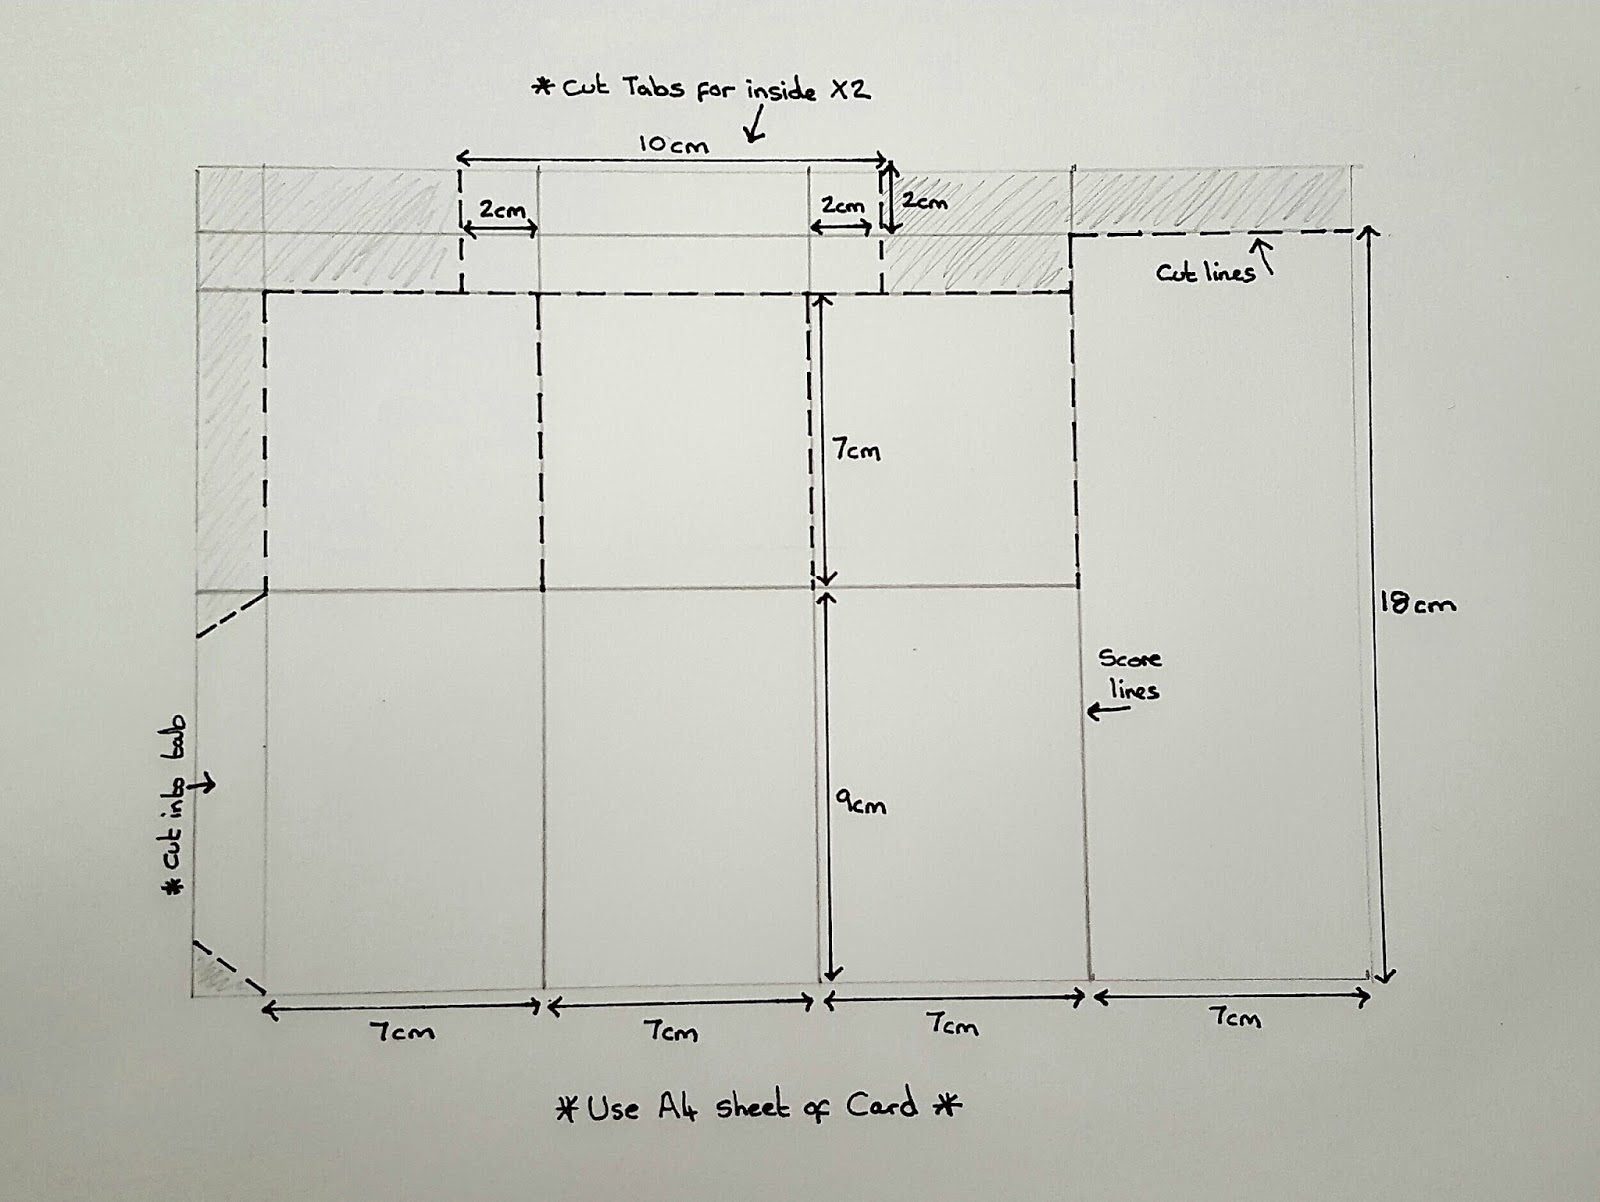
Pop-Up box card video ~ Part 1
Some of part 1 is a little off camera, I am still working on a
good set-up for filming and the camera was a little low down to get the whole
A4 sheet in while I was working on it, but hopefully you can still get an idea
of how to make it. Here is an image to hopefully help explain what to score and
cut a little better:
Basics on how to make the Pop-Up Box base:
* To start with you
want to turn your A4 Delightful Dijon cardstock horizontal and score down at
every 7cm (2 3/4"), which will give you 4 panels and a small tab slice.
* Then turn vertical
with the tab part closest to you, score the nearest 3 panels and tab at 9cm (3 2/4").
* Then score the
full length at 18cm (7").
* Cut along the top as
show above, and down to the 9cm (3 2/4") score line to create the ‘flap panels’ and at
an angle creating the tab on the side.
* Fold and burnish
all the score lines.
* Add adhesive to the tab, fold and stick to the inside of the box.
* With the longer
left over piece, cut 2cm (6/8") either side of the score lines creating a 10 X 2cm
strip with 2 score lines. Cut 2 at 2cm (6/8) thick. This becomes your inside tabs.
* Add adhesive to both ends of the tabs and stick to the inside of the box as in the video.
Once you have your box made you are ready to decorate! If creating this box in different sizes...take off 1/4" or 1/2cm off the box measurements for the card panels and again for the DSP to leave a small boarder :)
Pop-Up box card video ~ Part 1
They are
perfect for any theme for any occasion; try a balloon explosion, bouquet of
flowers or toy box theme.
Hope you enjoyed this project and have fun creating :)