Tuesday 20 November 2018

Simple Vintage Christmas Card


The Autumn/Winter catalogue is still available up till the end of December. If you do not have a catalogue and would like one, please do drop me a message. I will be happy to send one out to you - FREE.You can also find a link to the catalogue on the right hand side of my blog.

A traditional vintage Christmas card using the Dashing Deer Bundle (149935).
This card focuses on the distressing technique. By gently inking the edges and blending the area you can create an old faded feel. Taring the card stock is another simple way of adding a distressed look to your design and texture to your card.
The designer series paper has those lovely traditional reds and greens, along with thin strips of Night of Navy. I have used this colour for the main image and sentiment to tie in with the designer series paper. This make them stand yet does not look out of place.
Check out the tutorial below...

What you will need:
Thick Whisper White Card Stock (140490) - C6 card base                                                             
Under The Mistletoe Designer Series Paper (146921) - 5 3/4" x 4 1/8"
Whisper White Card Stock (106549) - 3 1/2" x 5"
                                                             - Piece big enough for the stamped image.

Sponge Daubers (133773)

Inks;
 Night of Navy and Crumb Cake.


Hope you enjoyed that tutorial. Please like, subscribe and leave a comment :)

Happy Crafting,
      AMIE

Read more »

Monday 8 October 2018

Creepy Crafts Halloween Series #7 ~ Halloween Gable Box


For the last tutorial in my Creepy Crafts Halloween Series we are decorating the Silver Mini Gable Box (145568) using the Spooky Sweets Bundle (149973).

A perfect little party favour or treat box and goes together super quick. Check out what else you need below.


What you will need:
Toil & Trouble designer series paper (147531) - 12" x 1 1/2"
Black Foil Sheet (147898) - Scallop Circle
Daffodil Delight Card Stock (121680) - 2 1/8" Circle

Basic Black Bakers Twine (141682)
Black Glittered Organdy Ribbon (147897)
Layering Circle Franelits (141705) 

Inks; Memento Black.


Hope you enjoyed that tutorial. Please like, subscribe and let me know what you think :)

Happy Crafting,
      AMIE
Read more »

Sunday 7 October 2018

Creepy Crafts Halloween Series #6 ~ Chequered Pumpkin Card


Project #6 is a super fun 'distressed' card featuring the Toil & Trouble designer series paper (147531) and the Buffalo Check background stamp (147794).
Inspired by and cased from Joy Stampin.

Loving the rustic look this background stamps gives. It is currently my favourite background stamp and so versatile! You can stamp in any colour making it super cute for backgrounds in baby cards, male cards, and Christmas cards. Add lines with a marker to turn this into a tartan, and if you want a cleaner check look stamp a couple of times using your Stamparatus. For me this is a must have background stamp!

I love the rustic, distressed feel of this card. It would make the perfect Autumn/Fall card by changing the black for brown and orange tones.

What you will need:
Basic Black Card Stock (146991) - 3 5/8" x 2 5/8"
Whisper White Card Stock (106549) - 3 3/4" x  5 1/2"
                                                            - 3 1/2" x 2 1/2"
Toil & Trouble designer series paper (147531) - Cut out the pumpkins

Basic Black Bakers Twine (141682)
Metallics Sequin Assortment (144214)
Tonic Studios Tim Holtz Paper Distresser // Or use your Paper Snips

Inks; Memento Black.


Hope you enjoyed the tutorial. Please like, subscribe and let me know what you think :)

Happy Crafting,
      AMIE
Read more »

Friday 5 October 2018

Creepy Crafts Halloween Series #5 ~ Colourful Bats Card

Tutorial five in my Creepy Crafts Halloween Series!

Inspired from cards I have seen on Pinterest, this colorful yet simple Halloween card uses the Spooky Sweets Bundle (149973).

Create a moon using a circle cut from paper or card stock. Place this over your desired area and blend the ink using a Sponge or Sponge Dauber. This simple technique is a fun way to add backgrounds and scenery to your cards.

I love how colorful this card is! and just goes to show blacks don't have to just be black.


What you will need:
Thick Whisper White Card Stock (140490) - C6 card base
Whisper White Card Stock (106549) -  3 7/8" 5 5/8"
Basic Black Card Stock (121688) - 4 3/16" x 5 13/16
Bermuda Bay Card Stock (131286) - 4" x 5 6/8"

Inks; Memento Black, Pumpkin Pie, Bermuda Bay, Daffodil Delight and Perfect Plumb.


Please like, subscribe and let me know what you think :)

Happy Crafting,
      AMIE
Read more »

Thursday 4 October 2018

Creepy Crafts Halloween Series #4 ~ Treat Bag

Wow, we are already on project #4 in my Creepy Crafts Halloween Series!

Inspired by Janet Wakeland, today's project is a fun treat bag. This little bag is perfect for using up your designer series paper and super quick to put together! These gusseted bags are amazing. An ideal size for a variety of treats, and not just the sweet kind. Fill them with nail varnishes, stationary, bath bombs... and of course sweets, chocolates or pop corn.

The Spooky Sweets stamp set (147716) again comes in handy for sweet treat sentiment. For the main image, cut your image from the designer series paper (or stamp and colour your own). The paper has so many fun options from Witches hats and cauldrons, to bats. A super fun way to dress up treats for Halloween.
What you will need:
Whisper White Card Stock (106549) - 2 1/8" x 3"
Highland Heather Card Stock (147010) - 2 1/4" x 3 1/8"
Toil & Trouble designer series paper (147531) - 2 7/8" x  12"
Score at 2" and 7"

Basic Black Bakers Twine (141682)
3 x 6 Gusseted Cellophane Bags (141704)

Inks; Memento Black.


Hope you enjoyed this tutorial. Please like, subscribe and let me know what you think :)

Happy Crafting,
      AMIE
Read more »

Wednesday 3 October 2018

Creepy Crafts Halloween Series #3 ~ Spooky Owl Card


Welcome to project #3 in my Creepy Crafts Halloween Series!

Today I have a spooky owl card for you that uses masking and blending techniques to create this fun colourful background, on what is mostly a black and white card.

I have used the wonderful Still Night stamp set (147670) for my focal image, which was carefully masked off too blend the background. I'm not going lie, fussy cutting those branches was not easy, but what a lovely effect it has created! Well worth it, I just love it.
The longest part of this card is the fussy cutting of masks and taking the mask carefully off. Other than that, it is so simple to put together. If Masking is something you would rather not do, you could stamp and die cut the images separate and lay them over your blended circle background. It would give a similar effect.
For the sentiment I used letters from the Pick A Pennant stamp set (146499) - a super handy stamp set if you can not find the right type of sentiment stamp!
Check out the tutorial below on how I used masking and blending for this fun spooky owl card. Grab a cuppa as its a little longer than my usual videos.

What you will need:
Thick Whisper White Card Stock (140490) - C6 card base
Whisper White Card Stock (106549) - 3 7/8"x 5 1/2"
                                                             - 1/2" x 4 1/8"
Basic Black Card Stock (146991) - 4" x 5 5/8"
Black Foil Sheets (147898) - 5 3/4" x 4 1/8"

Whisper White Bakers Twine (124262)
Layering Circle Framelits (141705)
Glossy Accents 
White Gel Pen - (from Paperchase)
Masking Tape

Inks; Memento Black, Pool Party, Fresh Fig and Night of Navy.
Stampin' Write Markers: Pineapple Punch and Basic Black.


Hope you enjoyed the tutorial. Please like, subscribe and let me know what you think in the comments below :)

Happy Crafting,
      AMIE
Read more »

Tuesday 2 October 2018

Creepy Crafts Halloween Series #2 ~ Bat Cake Toppers

For project two in my Creepy Crafts Halloween Series we have some fun cake toppers. Perfect for a spooky themed party!

So simple and quick to make, these will look fab on your cupcakes or as part of your cocktail decoration. Although I have not hosted or thrown a party in a while, I love organising themed parties, especially if I can get creative with the decorations. This would of course include the smaller details like cake toppers!

For these cake toppers I used the Spooky Sweets stamp set (147716). This is a fantastic stamp set when needing smaller Halloween sentiments for treat packaging.
Get 10% off when buying the Spooky Sweets bundle (149973) which includes the stamp set and coordinating punch. Some of the stamps in the set also coordinate with another favourite of mine, the Twinkle Builder punch (146321).
So this really is a perfect set for all your Halloween treat packaging and party decor this year!

What you will need:
Basic Black Card Stock (146991)
Smoky Slate Card Stock (131291)

Rhinestone Basic Jewels (144220)
Spooky Bats Punch (148014)
Cocktail Sticks

Inks; Memento Black.


Hope you enjoyed that tutorial. Please like, subscribe and let me know what you think :)
Join me tomorrow for project #3 in my Creepy Crafts Series.


Happy Crafting,
      AMIE
Read more »

Monday 1 October 2018

Creepy Crafts Halloween Series #1 ~ Ghostly Milk Carton

Today is the first tutorial in my Creepy Crafts Halloween Series!

I love Halloween, though it is not as big or popular as it may be in America, its sure is getting there here in the UK. It's still a fab excuse to throw a party, have a horror movie night or go out in dressed up as your favourite spooky character. It's all just fun, fun, fun!
Either way you will need some treats to hand out to Trick or Treaters, or just for your children... and maybe their class. I have 7 projects coming back to back full of creepy crafty ideas for you to make this Halloween season.

We are starting with a basic Milk Carton Box, decorated using the wonderful Toil & Trouble designer series paper (147531) and the Labels To Love stamp set (144967).
I absolutely love this style of box! They may be daunting to make at first, but once you get the hang of it you can adjust the sizes to fit all sorts of goodies in them... and of course decorate them for any occasion. This fun ghostly box is the perfect size to fit a nice amount of your favourite treats in.

What you will need:
Basic Black Card Stock (146991) - 8 1/2" x 6 1/2"
Score long side; 2", 4", 6" and 8"
Score short side; 2", 5" and 6"
Highland Heather Card Stock (147010) - 1 7/8" x 2 7/8" (x4)
                                                                  - 1 7/8" x 3 3/4" (x2)
Toil & Trouble designer series paper (147531) - 1 3/4" x 2 3/4" (x4)
                                                                             - 3/4" x 1 3/4" (x2)
Whisper White Bakers Twine (124262)
Black Glittered Organdy Ribbon (147897)
Rhinestone Basic Jewels (144220)
Everyday Label Punch (143861)

Inks; Memento Black.
Stampin' Write Markers; Pumpkin Pie.


Hope you enjoyed the tutorial. Please like, subscribe and let me know what you think :)


Happy Crafting,
      AMIE
Read more »

Sunday 23 September 2018

Pinkies Team Training Day - Kids & Babies Swap Group

TWINKLE TWINKLE BABIES MOBILE


Today I do not have a tutorial for you but wanted to share a project I made for the PINKIES TEAM training day this weekend.

Normally we would make a number of simple swaps (anything from 50 to 100!) and get that number in swaps back. For this training day we were to choose a swap group to participate in, which was for 6 people and had a particular theme. Having fewer people in each group meant we could create a more detailed swap!
I chose the 'Kids & Babies' group. For this we were to create a project using the stamps from the Kids and Babies section of the Annual Catalogue. Of course I had to use almost everything from the Twinkle Twinkle Suite!

It took me a while to decide what I wanted to make, maybe a gift box, maybe a nice shaker card... then I had a light bulb moment while at my parents home. They have a lot of wind chimes and dream catchers (which I love). This project is not an unusual idea, nor something new, but what a fab way to use your stamps, punches and embellishments for adorable handmade home decor and gift projects.
Once I had sketched out my design and figured out how I was going to go about putting them together, they surprisingly did not take long to make. They can be as detailed or as simple as you like. I made 3 in pink, 3 in blue, wrapped each in stamped tissue paper and packaged in a hand made envelope using the lovely Twinkle Twinkle designer series paper. I absolutely love how I was able to make matching gift packaging thanks to the amazing coordinating products.

This sort of project is a perfect little handmade gift idea and super easy for sending in the post!
You do not have to just use clouds and stars; why not try this with our cute baby elephants, flying pigs, hot air balloons, butterflys, bats, ghosts or even flowers... adapt it to your recipient, young or old! Add beads, bells, charms or small chimes. The creativity is endless!

So, here is what you will need to create this cute Twinkle Twinkle Babies Mobile:

What I used:
Little Twinkle Bundle (148414)
Up & Away Thinlits (142748) - Clouds
Wood crate Framelits (143730) - Large Stars
Pretty Lable Punch (143715) 

Pool Party Card Stock (124391)   
Petal Pink Card Stock (147009)           
Silver Foil Sheet (132178)
Sparkle Glimmer Paper (146957)
Whisper White Card Stock (106549)

Twinkle Twinkle Designer Series Paper (146284)

Silver & Pool Party Bakers Twine (147015)
Silver & Petal Pink Party Bakers Twine (146288)

4" Metal Dream Catcher Hoop - 6 Pack or Single Hoop
White Tissue PaperEbay

Inks;
 Pool Party &/or Petal Pink


Stamping on tissue paper adds a lovely effect to basic gift packaging.


Add a bellyband and simple embellishment to complete your gift envelope.

Hope you like this cute gift idea and give it ago yourself!
I really enjoyed making these and hope my swap partners love them. Swaps are optional but are a brilliant way to get lots of ideas and inspiration from fellow demonstrators, but this is also something you can do with a group of friends. 

If you would like to purchase any of the products you see here, click 'Shop Online' which can be found on the top right of my blog, or feel free to get in touch with any questions.
I will do a follow up swap video shortly to share with you the ideas and creations I got back from other Demonstrators in this swap group :)

Happy Crafting,
      AMIE

Read more »

Sunday 9 September 2018

Dashing Deer Festive Thank You Card


    The Autumn/Winter catalogue is now live for customers. I am so excited to be able to show you some fun projects to make this season using our lovely new products. If you do not have a catalogue and would like one, please do drop me a message. I will be happy to send one out to you - FREE.
You can also find a link to the catalogue on the right hand side of my blog.

For today's tutorial I am using the Dashing Deer Bundle (149935) and Joyous Noel Speciality Designer Series Paper (147816) to create this lovely festive card. I absolutely love the colours, which I took from the designer series paper.
A simple card using a selection of embellishments that give it that extra shimmer and festive feel. Check out the tutorial below...

What you will need:
Thick Whisper White Card Stock (140490) - C6 card base                                                               
Tranquil Tide Card Stock (144252) - 1" x 4 3/16"
                                                           - 2 1/8" circle
Joyous Noel Speciality Designer Series Paper (147816) - 4" x 4 3/16"
Whisper White Card Stock (106549) - Big enough for stamped image
Circle Layering Framelits (141705)

Whisper White Solid Bakers Twine (124262)
Pearlised Doilies (146936)
Frosted & Clear Epoxy Droplets (147801)

Inks;
 Tranquil Tide and Soft Suede


Hope you enjoyed that tutorial. Please like, subscribe and leave a comment :)

Happy Crafting,
      AMIE
Read more »

Wednesday 29 August 2018

Birthday Hamper

Perfect gift idea for when your friend deserves to be pampered for their birthday... 


I put together this pamper hamper for my good friend for her birthday. Packaged using the Picture Perfect Birthday stamp set (145519) in Lemon Lime Twist, Bermuda Bay and Daffodill Delight. The colour combination is bright and fun, but you could tailor this for anyone and any occasion. 
I simply created an open top box to hold all the items and decorated the sides. Placed this in a large cello bag and finnished it off with ribbon and a matching tag. These where made to coordinate with the card, which I made first.

This Pamper Hamper included: 
Box of cadburys dairy milk chocolates
Small bottle of proccecco 
Relaxation Face mask
Cucumber Eye pads
Foot Spa mask
Hand mask
Scented candle
Lavender bath bomb

Its a super nice way to package a gift like this and does not take too long to make. Have a hunt through your stamp sets, maybe try floral for mothers day, put together a Christmas hamper or themed hamper. These could be movie themed with a DVD, pop corn, chocolates... Or even a tackle hamper for a fishing fan. The possibilities are endless!

To order this fun stamp set click the 'Shop Online' button at the top of my blog. Use the hostess code to receive extra thank you goodies from me!

Happy Crafting,
      AMIE


Read more »

Wednesday 18 July 2018

Simple Twinkle Twinkle Card


Today we have a cute, simple card using the Little Twinkle Bundle (148414). I'm still as much in love with this set as I was when I fist saw it.

This Designer series paper is a must have. Gorgeous star patterns and fun stitched designs that make projects made with this paper versatile enough to work for a variety of recipients and occasions. The punch makes for super easy embellishments, add foil and ribbon and you have a simple yet cute card make in minutes.

What you will need:
Thick Whisper White Card Stock (140490) - 8" x 5 1/4 scored and folded in half. (card base)
Twinkle Twinkle DSP (146284) - 4" x 5 1/4"
Crumb Cake Card Stock (121685) - 1 3/8" x 4"

Gold Foil Sheet (144146)
Gold Metallic Edge Ribbon (144213)

Inks; Memento Black


I hope you enjoyed this tutorial :) Don't forget to like and subscribe.
Any orders placed online don't forget to use the Hostess code located at the top right of my blog for extra goodies from me!

Happy Crafting,
      AMIE
Read more »

Wednesday 4 July 2018

Twinkle Twinkle Gift Box


Before we start on today's project, grab a cuppa, its a long one. Join me as I take you through the assembly of this cute box which features the Little Twinkle Bundle (148414). This bundle consists of the stamp set and coordinating punch. Part of a very adorable suite and when you add some heat embossing, foil paper and rhinestones, the results can be rather stunning.

If you did not want to make this box from scratch you could always pick up the Mini Pizza Boxes (144645) and decorate in the same way.

What you will need:
Thick Whisper White Card Stock (140490) - 10 1/2" x 5 1/2"
                                                                       - Score on the long side at; 3 1/2", 4 1/2", 8" & 9"
                                                                       - Score on the short side at; 1" & 4 1/2"
Twinkle Twinkle DSP (146284) - 3 1/4" x 3 1/4" (x2)
                                                     - 3 1/4" x 3/4" (x3)
Basic Grey Card Stock (121689) - 3 3/8" x 3 3/8" (x2)
                                                      - 3 3/8" x 7/8" (x3)
                                                      - Piece for your scalloped circle.
Pool Party Card Stock (124391) - Piece for your regular circle.
Silver Foil Sheets (132178)
Layering Circle Framelits (141705) 
Silver Metallic Edge Ribbon (144213)
Silver & Pool Part Bakers Twine (147015)
Detailed Trio Punch (146320)
Silver Embossing Powder (109131)
Embossing Buddy (103083)
Heat Tool (129054)

Inks; Versa Mark.


I hope you give it a try :) Don't forget to like and subscribe.

Happy Crafting,
      AMIE

Read more »

Friday 29 June 2018

Little Twinkle Magnetic Bookmark


Today's project is a magnetic bookmark that features the super cute Little Twinkle Stamp Set (146452). I absolutely love these bookmarks! No more losing your page when your bookmark slips out. This will stay in place and does not damage your book either.
The Twinkle Twinkle Suite is my favourite from the new catty. I just love everything in it, from the stamp set to the designer series paper and bakers twine. Although this suite has children in mind and makes perfect projects for new arrivals, it can also make fun projects for adults too.

This project, which I just love, was inspired by a Make & Take we made at our last team training weekend. I took the basic idea and adapted it for this project, but you could make these bookmarks with any stamp sets you have at home. They can be as simple or elegant as you wish. I have spruced this project up a little by heat embossing the image and sentiment, giving a gorgeous touch to the focal point while keeping the bookmark as flat as possible.

What you will need:
Thick Whisper White Card Stock (140490) - 2 3/8" x 9" scored and folded at 4 1/2"
Twinkle Twinkle DSP (146284) - 2 3/8" x 3"

Silver & Pool Part Bakers Twine (147015)
Detailed Trio Punch (146320)
Silver Embossing Powder (109131)
Embossing Buddy (103083)
Heat Tool (129054)

Inks; Night of Navy & Versa Mark.


So that is our project for today. A super simple project and fab little gift idea that is easy to post.

If you do not already have a catalogue, get in touch to request one free of charge, also includes a little catalogue gift pack. (Do not forget when requesting a catalogue to sending me your postal address).
When shopping with me online used the hostess code to get some extra goodies from me, and also your card stock swatch for shopping with me during the month of June.

Happy Crafting,
      AMIE

Read more »

Monday 18 June 2018

Pinkies Birmingham Weekend Swaps ~ Polaroid Fridge Magnets


This weekend was the Pinkies team training weekend in Birmingham. Its a fantastic weekend of crafting, training and inspiration with fellow demonstrators who are apart of the Pinkies team. A chance to catch up with friends and make new ones. 
During this event, like at most Stampin' Up! events, we exchange 'swaps'. For this you create a number of the same project idea or samples (in this case 37) to swap with other demonstrators, you will then receive 37 different projects in return giving you a lovely range of new ideas and items for your sample boards to show customers. These projects can range from cards and book marks to 3D items and gift ideas. Its an amazing and fun way to meet new people and get lots of extra inspiration.

For my swaps I decided to make Polaroid Fridge Magnets, but not the photo kind (of course you could swap the sentiment out for a photo). I wanted to incorporate the idea of using a supportive and encouraging sentiment that could be meaningful to someone, particularly to a person suffering with Anxiety or Depression. So for some of the swaps I included the sentiment 'You Matter' from the Around The Corner stamp set (147464) which was just perfect. 
For others I used the sentiment 'Hello there', but you could change the sentiment to fit any occasion or recipient. 

What you will need:
Thick Whisper White Card Stock (140490) - 2 3/4" x 3 3/8" (x3)
In-colour 2018-2020 DSP (146963) - Big enough for frame or centre piece.
In-colour 2018-2020 Card Stock (106549) - For die cut flower embellishment.

Petals & More Thinlits (145655)
Silver 3/8" Metallic Edge Ribbon (144213)
Rhinestone Basic Embellishments (144220)
Layering Square Framelits (141708) 
Silver Embossing Powder (109131) 

Inks; Versa Mark.

1) Cut your three pieces of Thick Whisper White card stock. One for your base, two for your frame.
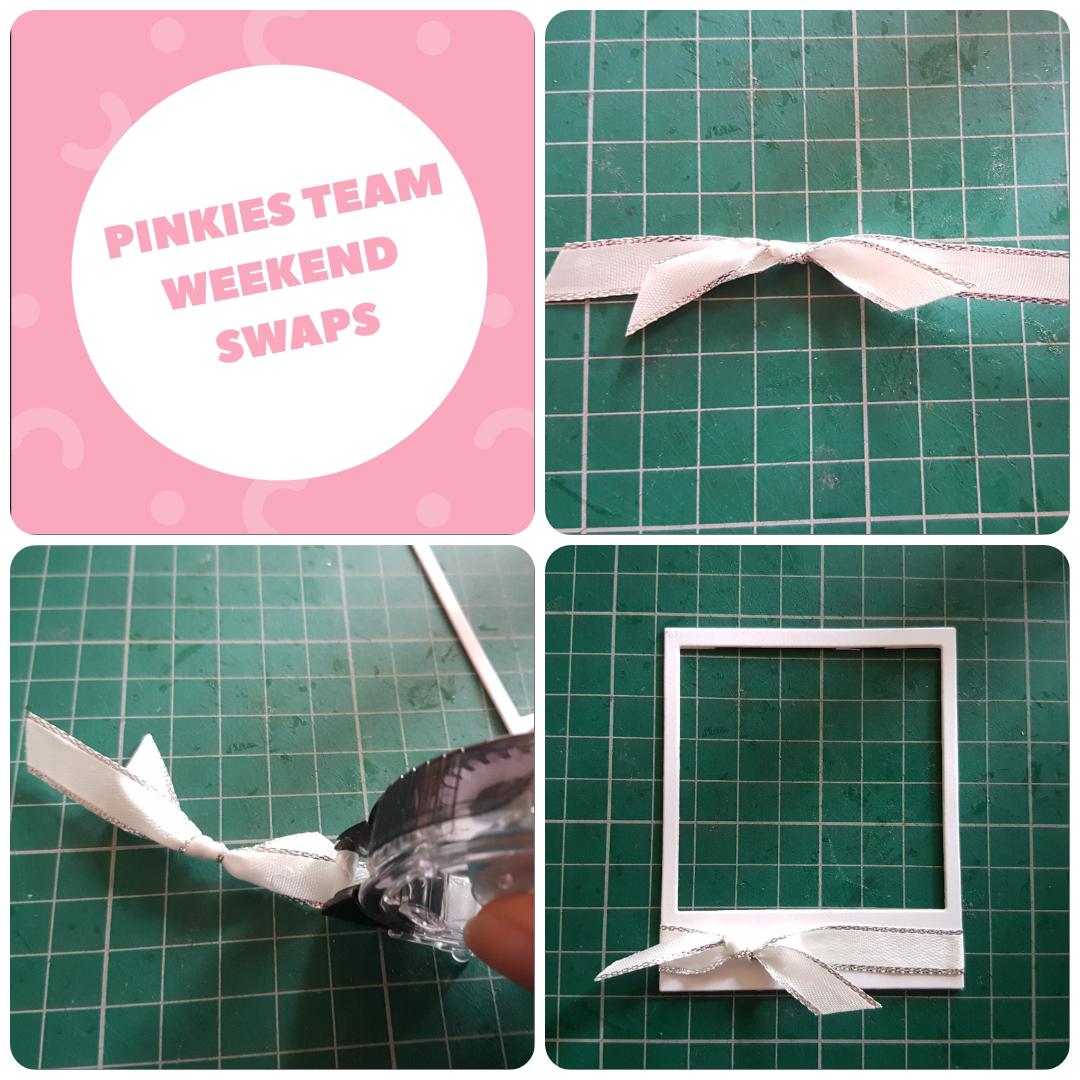
2) Use your Layering Square Framelit to cut a square out of the two panels near the top of the card stock leaving a small frame. This is to create your 'window' to get your Polaroid panel.
3) Use the same square framelit to cut your chosen designer series paper.
4) Glue both Polaroid panels together. The extra thickness gives it more stability, and of course a touch of dimension to the frame.
5) Cut two pieces of ribbon. One long enough to go around the bottom of your Polaroid, and one to tie a knot with.
6) Tie a knot or bow in your ribbon and glue to the base of the Polaroid with snail adhesive.

7) Glue the Polaroid panel to your Thbase panel.
8) Attach or glue on your magnetic strips to the back.
9) Heat emboss your chosen sentiment to your designer series paper square. I chose silver as it coordinates with the edged ribbon and rhinestones.
10) Glue to the centre of your frame.
11) Die cut your flowers from coloured card and place a mini dimensional to the centre of 3 of the flowers. These will be hidden by rhinestones later.
12) Place the flowers to the top corner and add rhinestones to the centre of the three flowers with dimensional behind them.


13)  If you are gifting or selling these at craft fairs they are easy to package up.
Simply place into a cellophane bag and staple closed. Fold over a piece of card stock, add some designer paper, and adhere down with some Tear & Tape.


A simple and easy project to put together, once you have all your parts ready. Will also make a nice gift for Mother's Day, to include in happy mail, or as a gift to a friend!
I hope you enjoyed reading about this project and do give it a go.

Happy Crafting,
 AMIE

Read more »